WLAN4-6: Unterschied zwischen den Versionen
Mkurz (Diskussion | Beiträge) |
Mkurz (Diskussion | Beiträge) |
||
| Zeile 25: | Zeile 25: | ||
<li style="display: inline-block;"> [[File:Win7_radius3.png|thumb|||<b>Step3:</b><br>When connection for the first time, a warning will show up. <b>Verify</b> that values for <b>Radius-Server</b> and the <b>Root-CA</b> are <b>equal to</b> those on the <b>image</b>. If the values are the same, click <b>Connect</b>]] </li> | <li style="display: inline-block;"> [[File:Win7_radius3.png|thumb|||<b>Step3:</b><br>When connection for the first time, a warning will show up. <b>Verify</b> that values for <b>Radius-Server</b> and the <b>Root-CA</b> are <b>equal to</b> those on the <b>image</b>. If the values are the same, click <b>Connect</b>]] </li> | ||
<li style="display: inline-block;"> [[File:Win7_radius4.png|thumb|||<b>Step4:</b><br>You are connected and the internet is already accessible. The <b>folling steps</b> are <b>necessary for</b> your <b>account-security</b><br>Therfore: right-click onto to wireless-symbol and <b>open</b> the <b>Network and Sharing Center</b>]] </li> | <li style="display: inline-block;"> [[File:Win7_radius4.png|thumb|||<b>Step4:</b><br>You are connected and the internet is already accessible. The <b>folling steps</b> are <b>necessary for</b> your <b>account-security</b><br>Therfore: right-click onto to wireless-symbol and <b>open</b> the <b>Network and Sharing Center</b>]] </li> | ||
| − | <li style="display: inline-block;"> [[File:Win7_radius5.png|thumb|||<b>Step5:</b><br>After clicking <b>Manage wireless networks</b> on the left sidebar, select the entry called <b>pfeilheim-wlan</b> and open it by double-clicking or with right-click | + | <li style="display: inline-block;"> [[File:Win7_radius5.png|thumb|||<b>Step5:</b><br>After clicking <b>Manage wireless networks</b> on the left sidebar, select the entry called <b>pfeilheim-wlan</b> and open it by double-clicking or with right-click followed by a click on properties]] </li> |
<li style="display: inline-block;"> [[File:Win7_radius6.png|thumb|||<b>Step6:</b><br>Click on <b>Settings</b>]] </li> | <li style="display: inline-block;"> [[File:Win7_radius6.png|thumb|||<b>Step6:</b><br>Click on <b>Settings</b>]] </li> | ||
<li style="display: inline-block;"> [[File:Win7_radius7.png|thumb|||<b>Step7:</b><br>1-3 should be equal to your configuration, simply tick 4 and 5 and add a 'public-name']] </li> | <li style="display: inline-block;"> [[File:Win7_radius7.png|thumb|||<b>Step7:</b><br>1-3 should be equal to your configuration, simply tick 4 and 5 and add a 'public-name']] </li> | ||
Version vom 29. April 2018, 19:07 Uhr
First of all, thanks to Akademikerhilfe for installing wifi-accesspoints all over the building inside Pfeilheim4-6 as this guide would not have come to existance otherwise ;)
Inhaltsverzeichnis
Configurations
- Login at Akademikerhilfe-Portal and change your password (you can also 'change' it to the same as it was before)
- Make sure you can login at the portal
- Delete the wifi-profile from your device (only if you have used a wifi called 'pfeilheim-wlan' beffore - e.g. at the club)
- Connect to pfeilheim-wlan and enter your valid credentials
Scroll down for an image-based description.
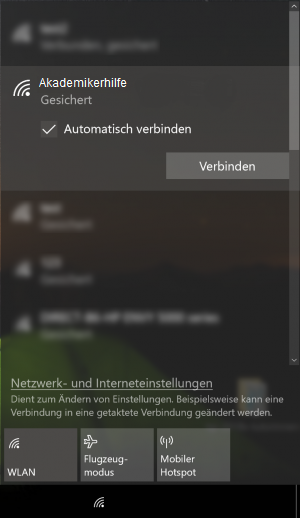
Windows 10
Guide for deleting a wireless profile (if you've used the 'pfeilheim-wlan' at the club, ... before)
-
 Step2:
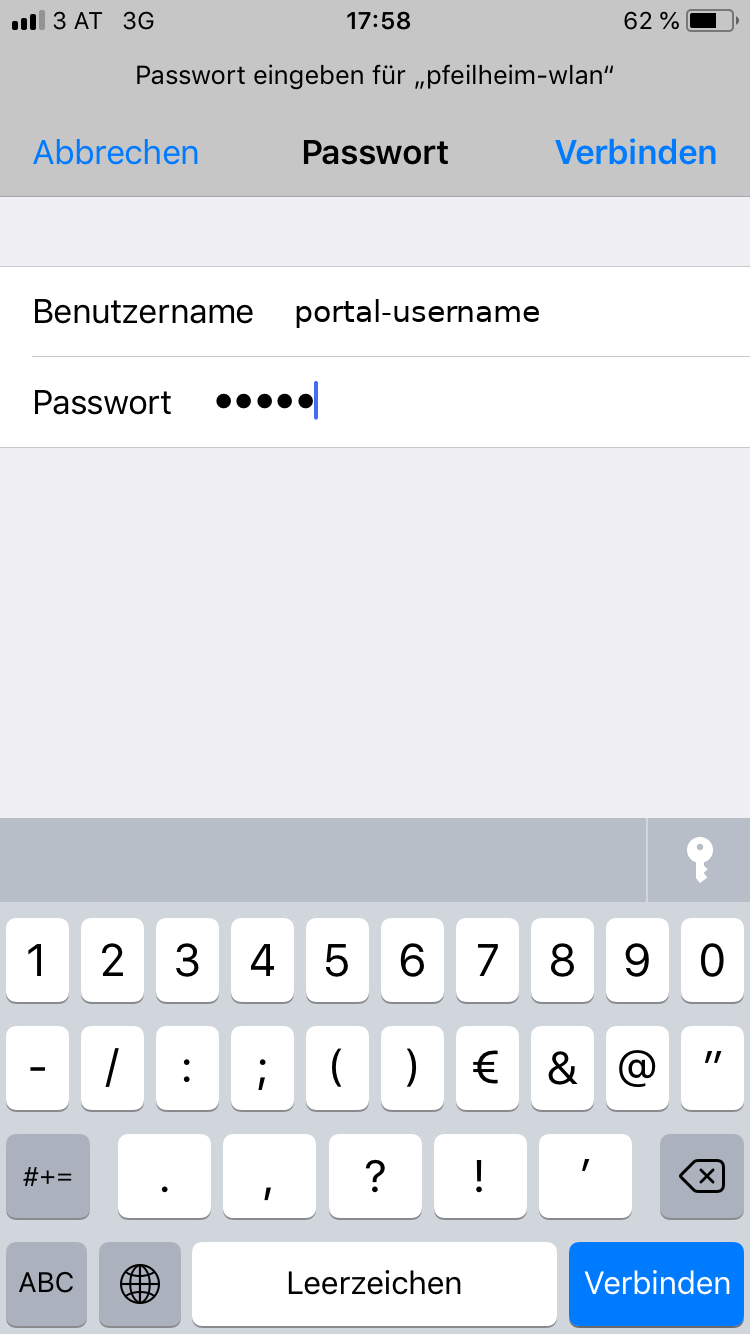
Use the same login credentials as for the Akademikerhilfe-Portal
Note: You have to change your the portal-password before the login works!


Quelle: https://www.zid.tuwien.ac.at/tunet/wlan/anleitungen/windows_10/
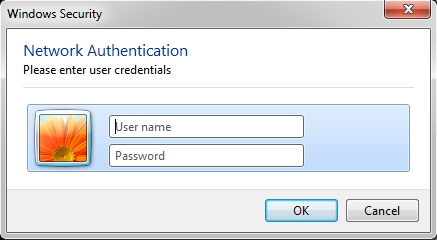
Windows 7
Guide for deleting a wireless profile (if you've used the 'pfeilheim-wlan' at the club, ... before)
-
 Step2:
Use the same login credentials as for the Akademikerhilfe-Portal
Note: You have to change your the portal-password before the login works!


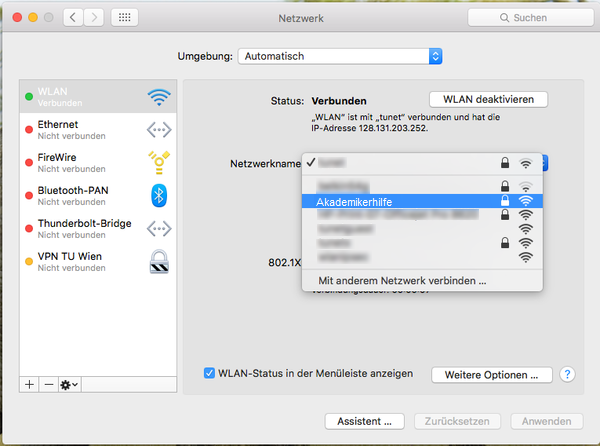
Mac OSX
Guide for deleting a wireless profile (if you've used the 'pfeilheim-wlan' at the club, ... before)
-
 Step2:
Select the wireless-network called pfeilheim-wlan
Use the same login credentials as for the Akademikerhilfe-Portal
Note: You have to change your the portal-password before the login works!


Quelle: https://www.zid.tuwien.ac.at/tunet/wlan/anleitungen/mac_os_x/
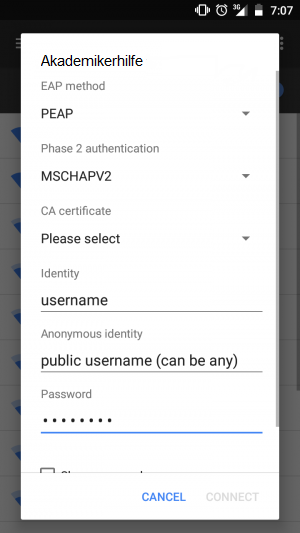
Android
Guide for deleting a wireless profile (if you've used the 'pfeilheim-wlan' at the club, ... before)
-
 Step2:
Use the same login credentials as for the Akademikerhilfe-Portal
Note: You have to change your the portal-password before the login works! -
 Step2:
Use the same login credentials as for the Akademikerhilfe-Portal
Note: You have to change your the portal-password before the login works!


iOS
Guide for deleting a wireless profile (if you've used the 'pfeilheim-wlan' at the club, ... before)


As always: if you have further questions or problems with the configuration, drop a mail: support@pfeilheim.sth.ac.at